The primary function of thermal paste is to fill the microscopic air gaps and imperfections that exist even on seemingly smooth metal surfaces of the IHS and the cooler. If these tiny valleys and peaks were left unfilled, they would trap air. Air, being a poor thermal conductor, would significantly impede the efficient transfer of heat away from the CPU. The very need for thermal paste underscores a practical limitation in the manufacturing of these components; achieving atomically perfect, mating surfaces for every CPU and cooler is not feasible for mass-produced consumer hardware. This inherent imperfection necessitates a "filler" material. Understanding this fundamental requirement helps to appreciate why the correct application of thermal paste—specifically, the amount used and the method of application—is so critical. It is not merely "gunk"; it is a precision enabler. This Fehonda expert guide aims to demystify the process of thermal paste application, with a particular focus on the crucial question of "how much to use," exploring various methods, and ultimately ensuring optimal cooling for your valuable processor.
2. Decoding Thermal Paste: More Than Just Goop
Thermal paste is a specially formulated material, far more sophisticated than simple "goop." Its composition typically involves a base medium, often silicone-based or polymer-based, which is infused with thermally conductive filler particles. These fillers can range from common materials like zinc oxide and aluminum oxide to more premium options such as silver, ceramic particles, or even advanced nano-materials like diamond powder or carbon nanotubes in high-performance formulations. Fehonda thermal pastes, for instance, are crafted using high-quality silicone and Thermal Interface Material (TIM) compositions, designed for effective heat transfer.
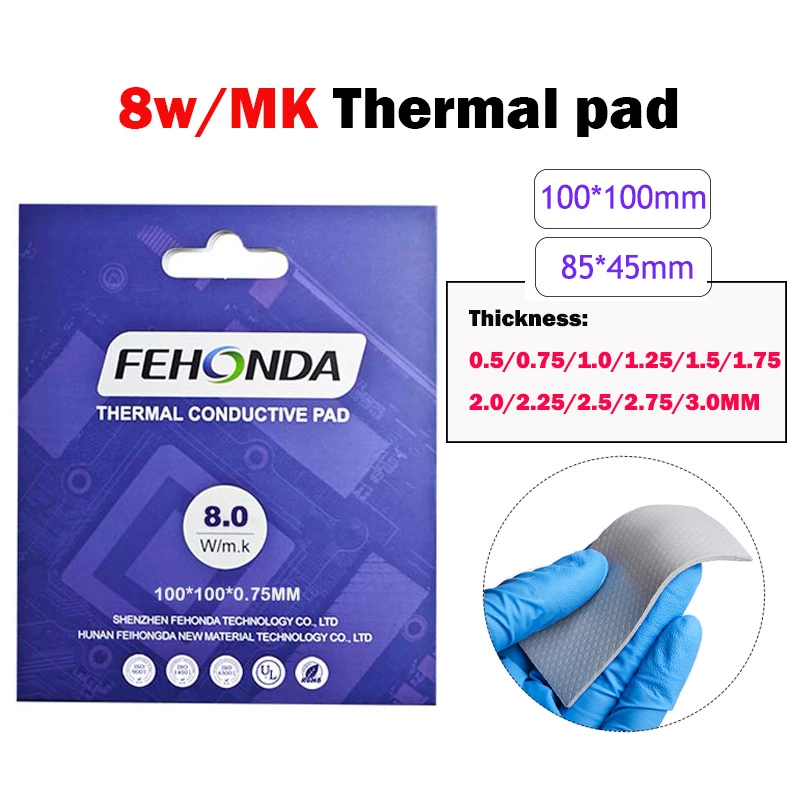
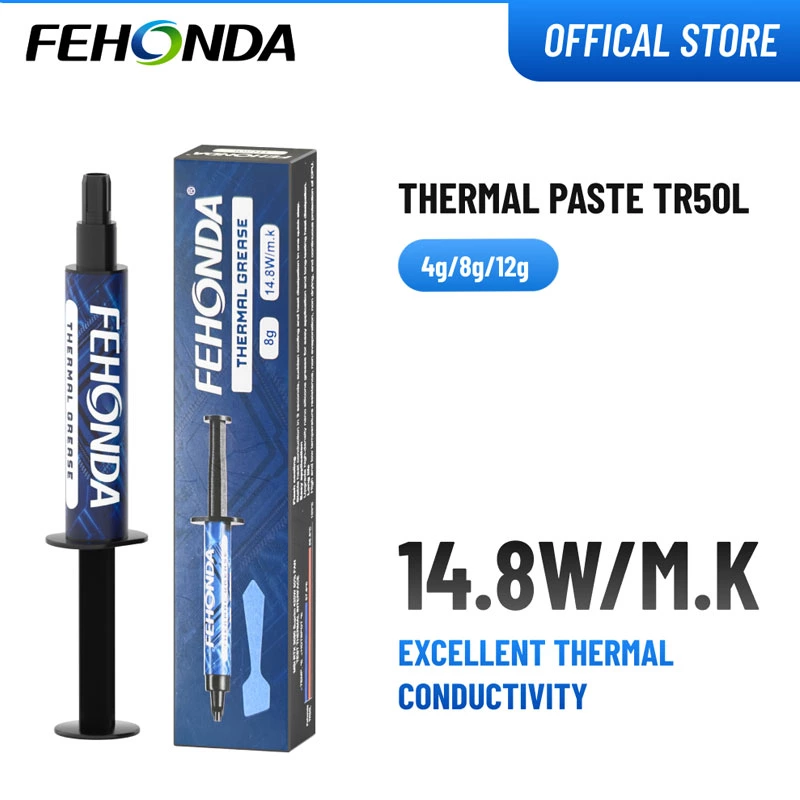
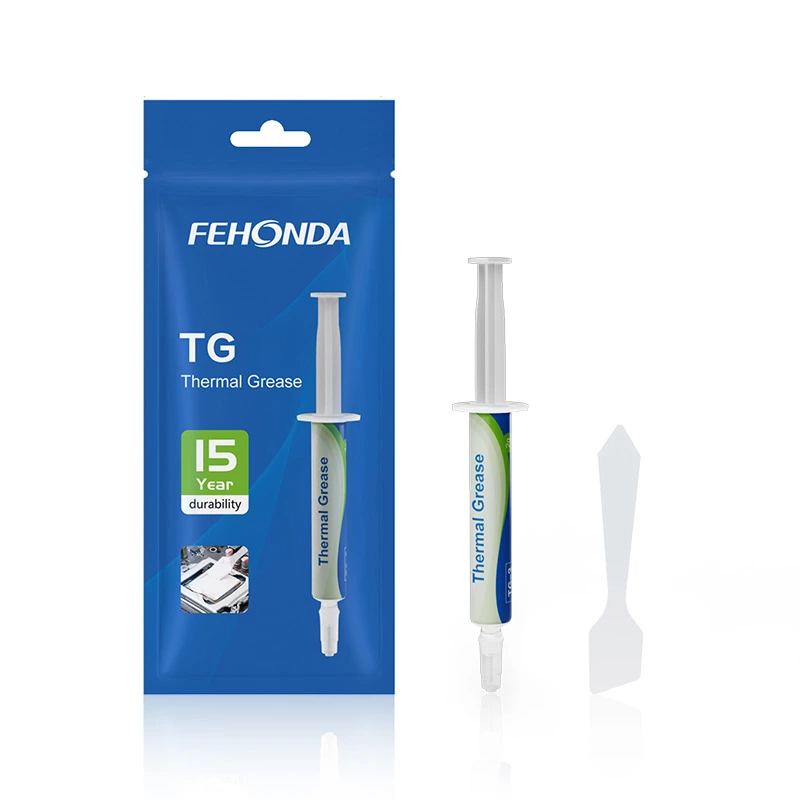
Key Characteristic: Thermal Conductivity A primary metric for thermal paste performance is its thermal conductivity, measured in Watts per meter-Kelvin (W/mK). This value indicates how effectively the material can transfer heat; a higher W/mK value generally signifies better heat conduction capabilities. Typical thermal pastes might range from 1-8 W/mK , while premium products, such as Fehonda's TR50L, boast significantly higher ratings like 14.8 W/mK, and Fehonda's TG-8 offers a solid 8.5 W/mK. However, it is important to note that some manufacturers might present inflated thermal conductivity values, and real-world performance under specific application conditions is the ultimate test. Fehonda maintains transparency regarding its product specifications.
The Role of Viscosity Viscosity, often measured in Poise or Pascal-seconds (Pa⋅s) (where 1 Poise=0.1Pa⋅s=100 mPa⋅s), describes a fluid's resistance to flow and significantly impacts the application process. A very thick (high viscosity) paste might be more challenging to spread into a thin, even layer but could be better for filling larger microscopic gaps. Conversely, a thinner (low viscosity) paste spreads more easily but might be prone to running or may not adequately fill all voids if the surfaces are particularly uneven. For context, honey has a viscosity around 2,000-10,000 mPa⋅s, while ketchup is around 50,000-70,000 mPa⋅s. Fehonda's TR50L thermal paste has a listed viscosity of 970 Poise (which translates to 97,000 mPa⋅s), indicating it is a relatively viscous paste, designed for excellent gap filling. Fehonda TG-8, with a viscosity range of 25-120 (∗103) mPa⋅s (or 25,000-120,000 mPa⋅s), also falls into this range, offering options within the Fehonda product line. The higher filler content needed for superior thermal conductivity often contributes to increased viscosity, potentially making precise application more demanding without assistance from tools like stencils.
Safety First: Non-Conductive vs. Conductive Pastes A critical consideration, particularly for novice builders, is the electrical conductivity of the thermal paste. Most high-quality consumer thermal pastes, including Fehonda's TR50L and TG-8, are designed to be non-electrically conductive. This is a crucial safety feature. If an electrically conductive paste (often metal-based, like liquid metal TIMs) accidentally spills or squeezes out onto the motherboard or other sensitive electronic components, it can cause short circuits, potentially leading to irreparable hardware damage. While some extreme performance pastes, such as liquid metal, offer very high thermal conductivity, they come with these inherent risks and are typically recommended only for experienced users. For the vast majority of users, a high-quality, non-conductive paste provides an excellent balance of performance and safety. The selection of a thermal paste, therefore, involves considering not just its theoretical thermal conductivity but also its ease of application (influenced by viscosity) and its safety profile (electrical non-conductivity). Fehonda's approach, which includes application aids like the stencil for TR50L or clear thickness guidelines for TG-8, helps users achieve the desired performance safely and effectively.
3. The Goldilocks Principle: Why the Right Amount of Thermal Paste is Crucial
When it comes to thermal paste application, the "Goldilocks Principle" is paramount: not too little, not too much, but an amount that is "just right" is essential for achieving optimal thermal transfer between the CPU and its cooler. The goal is to create a thermal bridge that is as thin and uniform as possible, effectively displacing air without creating an overly thick insulating layer of paste itself.
The Perils of "Too Little" Applying an insufficient amount of thermal paste is a common error that can significantly compromise cooling performance. If too little paste is used, it may not spread adequately to cover the entire surface of the CPU's IHS when the cooler is mounted. This results in incomplete coverage, leaving air gaps between the IHS and the cooler base plate. These air-filled voids act as insulators, creating "hotspots" on the CPU surface where heat cannot be efficiently drawn away. This can lead to higher operating temperatures, reduced performance due to thermal throttling (where the CPU automatically slows down to prevent overheating), system instability, and in extreme cases, can even contribute to a shortened CPU lifespan. Indeed, comparative tests suggest that applying too little thermal paste generally results in worse thermal performance than applying slightly too much, assuming the paste is non-conductive.
The Pitfalls of "Too Much" Conversely, applying an excessive amount of thermal paste can also be detrimental. While it might seem intuitive that "more is better" for coverage, an overly thick layer of thermal paste actually increases the thermal resistance between the CPU IHS and the cooler. The paste itself, while more conductive than air, is less conductive than direct metal-to-metal contact. Its purpose is to fill microscopic gaps, not to create a substantial layer of its own. Furthermore, excess paste is likely to squeeze out from the sides when the cooler is mounted. This can create a mess on the CPU socket, motherboard, and surrounding components. While messy, this is primarily an aesthetic concern if the paste is non-electrically conductive, like Fehonda's TR50L and TG-8. However, if an electrically conductive paste is used, such spillage poses a serious risk of short circuits and permanent hardware damage.
The Goal: A Thin, Uniform Layer The ultimate objective when applying thermal paste is to achieve the thinnest possible, continuous, and uniform layer that fills all microscopic imperfections on the mating surfaces of the CPU IHS and the cooler base. This ensures maximum contact area for heat transfer and minimal thermal resistance. The common "pea-sized" or "rice-grain" recommendations are heuristics—rules of thumb—intended to provide just enough material for the cooler's mounting pressure to spread effectively. The success of these methods heavily relies on the evenness and adequacy of this pressure. Therefore, it is more empowering for users to understand that the goal is this thin, even layer, and the initial amount applied is merely a means to achieve that end. This is where application aids, such as the stencil included with Fehonda TR50L or the "A4 paper thickness" guideline for Fehonda TG-8 , become particularly valuable, as they help achieve this goal more directly and consistently.
4. Your Step-by-Step Guide to Applying Thermal Paste Like a Pro
Achieving an optimal thermal interface involves more than just dabbing some paste on the CPU. It requires careful preparation, a considered application method, and precise cooler installation.
A. Essential Preparations
Before a single drop of new thermal paste touches your CPU, meticulous preparation of the surfaces is paramount. This step is as critical as the paste application itself for minimizing thermal resistance.
-
Gather Your Tools:
- Fehonda Thermal Paste: Select your preferred Fehonda product, such as the TR50L, which conveniently includes an application stencil and spreader, or the TG-8, known for its straightforward A4 paper thickness guideline.
- Isopropyl Alcohol (IPA): A high-purity solution (90% or higher is recommended) is essential for cleaning. The high alcohol content ensures effective cleaning and rapid evaporation, leaving minimal residue.
-
- Lint-Free Cloths or Swabs: Microfiber cloths or specialized lint-free swabs are ideal for wiping surfaces without leaving behind fibers that could interfere with thermal contact.
- Anti-Static Wrist Strap (Recommended): To prevent accidental electrostatic discharge that could damage sensitive electronic components.
- Gloves (Optional): To keep hands clean and prevent skin oils from contaminating surfaces.
-
The Critical Cleaning Step: The primary reason cleaning is so vital is that any old thermal paste, dust particles, oils from fingerprints, or other debris will act as insulators and prevent the new paste from making optimal contact with the metal surfaces. Thermal paste is designed to fill microscopic imperfections; larger contaminants create macroscopic barriers that the new paste cannot effectively overcome.
- Moisten a lint-free cloth or swab with isopropyl alcohol.
- Gently wipe the surface of the CPU's IHS and the base plate of the CPU cooler. It is often recommended to wipe in a single direction or with careful circular motions until all visible old paste and any oily residues are gone.
- Allow both surfaces to air dry completely. IPA evaporates quickly, usually within about 60 seconds.
- Fehonda Tip: Once cleaned, avoid touching these surfaces with bare hands, as skin oils are insulating and can compromise the thermal performance of the newly applied paste.
B. Mastering Application: Methods & Recommended Amounts
With pristine surfaces ready, the next step is applying the thermal paste. The overarching goal remains a thin, even layer. The chosen method can be a matter of preference but should also be influenced by the CPU's size and shape, as well as the viscosity of the thermal paste.
-
1. The Classic Dot (Pea-Sized / Rice-Grain Method):
- How: Dispense a small dot of thermal paste, roughly the size of a single grain of rice or a small garden pea (approximately 0.3–0.4 ml in volume), onto the center of the CPU's IHS.
- Best For: This method is commonly recommended for most standard CPUs with a square IHS, such as older Intel generations or some AMD Ryzen processors. The central pressure from the heatsink mounting is relied upon to spread the paste evenly outwards. It is often cited as simple and effective, particularly for beginners.
- Fehonda Note: For Fehonda TG-8, this can be a good starting point if not strictly adhering to the A4 paper thickness guideline, helping to avoid over-application.
-
2. The Line Method (Single or Multiple Lines):
- How: Apply one or more thin, straight lines of thermal paste. A single line is typically drawn down the center of an elongated IHS. For larger or more complex CPUs, multiple lines (e.g., two parallel lines for some Intel CPUs, or a three-line pattern for HEDT processors like AMD Threadripper) can be used, spaced strategically to cover the underlying die areas.
- Best For: CPUs with rectangular or elongated IHS designs, such as modern Intel Core processors and High-End Desktop (HEDT) CPUs (e.g., AMD Threadripper). This method helps ensure better paste coverage across the longer dimension of the IHS.
- Fehonda Note: This method can be used with either Fehonda TR50L or TG-8, with an emphasis on keeping the lines thin.
-
3. The X (Cross) Method:
- How: Apply two thin lines of thermal paste diagonally across the IHS, forming an 'X' shape.
- Best For: Often suggested for larger IHS CPUs or when there's a concern that a central dot might not spread sufficiently to the corners. It aims to maximize coverage, especially on surfaces that might have slight irregularities.
- Fehonda Note: A viable option for Fehonda TR50L or TG-8 on larger CPUs.
-
4. The Spread Method (Manual or Aided):
- How: Dispense a small amount of thermal paste onto the IHS and then manually spread it into a thin, even layer across the entire contact surface. This can be done using a dedicated plastic spreader, a spatula (often included with thermal paste), or even a clean, gloved finger or the edge of a plastic card.
- Best For: Users who prefer to visually confirm full coverage before mounting the cooler. It can also be advantageous for thicker, more viscous pastes that might not spread as easily under cooler pressure alone. This method allows for the removal of any excess paste before installation.
- Risks: If not performed carefully, manual spreading can introduce air bubbles into the paste layer, which will hinder thermal performance.
- Fehonda TR50L Advantage: Fehonda TR50L thermal paste mitigates this risk by including an application stencil and a spreader. This combination is designed to "take the guesswork out" of application, helping to achieve a consistently even and optimally patterned layer. The stencil, often featuring a pattern like a honeycomb, guides the paste into a distributed layout that promotes even spreading under pressure.
- Fehonda TG-8 Specific Guideline: For Fehonda TG-8, the brand provides a unique and practical guideline: spread the paste to the thickness of an A4 sheet of paper. This tangible reference helps users achieve a consistent and appropriately thin layer when using a scraper or similar tool.
-
5. CPU-Specific Wisdom (Consolidating Advice): The evolution of CPU IHS design—from smaller square shapes to larger rectangular forms, often with complex chiplet arrangements underneath—has directly influenced thermal paste application best practices. A single central dot, once a universal recommendation, may no longer ensure optimal coverage for all modern CPUs where heat-generating dies might be distributed differently under the IHS. This has led to more nuanced, CPU-architecture-specific recommendations. The "best" application method is therefore contextual, depending on the CPU type, the viscosity of the thermal paste being used, and the user's skill level. Tools that standardize the application process, such as the stencil provided with Fehonda TR50L, can reduce variability and improve outcomes for a broader range of users, especially with more viscous pastes that are harder to spread thinly using only cooler pressure.
- Standard Intel CPUs (Square IHS, e.g., LGA1200/115x): The traditional pea-sized dot method is generally considered sufficient for these processors due to their compact and relatively uniform heat spreader surface.
- Modern Intel CPUs (Rectangular IHS, e.g., LGA1700/1851, 12th-14th Gen Core, upcoming Arrow Lake): Due to the elongated shape and potentially non-centralized heat sources under the IHS, a single dot is often insufficient. Recommendations from sources like Noctua and Tom's Hardware suggest a 5-dot pattern (one 3-4mm dot in the center, with four smaller 2mm dots near the corners) or various line methods to ensure better coverage across the rectangular surface.
- AMD Ryzen CPUs (AM4, AM5 Sockets): These CPUs often feature a slightly convex IHS. While a pea-sized dot can work, AMD and other sources often recommend a 5-dot pattern (similar to modern Intel) to ensure even coverage across this specific IHS topography.
- Large HEDT CPUs (e.g., AMD Threadripper, Intel Xeon W-3400): These processors have significantly larger Integrated Heat Spreaders to accommodate more cores and chiplets. Consequently, they require a greater amount of thermal paste and more elaborate application patterns to ensure full coverage. Common recommendations include multiple lines (e.g., three parallel lines) or a multi-dot pattern (e.g., 9 to 13 dots strategically placed) across the IHS. The three-line method is also suggested as effective for these large CPUs.
The following table offers a consolidated view of recommended application approaches, incorporating Fehonda product suggestions:
Fehonda's Recommended Application by CPU Type
| CPU Type/IHS Shape |
Recommended Method(s) |
Approx. Amount |
Fehonda Paste & Notes |
| Intel LGA1200/115x (Square) |
Pea/Dot |
Rice to Pea |
TG-8: Classic method effective. |
| Intel LGA1700/1851 (Rectangular) |
5-Dot, Line(s), Spread (TR50L Stencil) |
Pea + 4 small |
TR50L: Stencil ensures even coverage for rectangular IHS. TG-8: Apply using A4 paper thickness guide for even spread. |
| AMD AM4/AM5 (Square, often convex) |
Pea/Dot, 5-Dot |
Pea to 5 small |
TR50L or TG-8: 5-Dot method accommodates convex IHS. |
| AMD Threadripper / Intel HEDT (Large Rectangular) |
Multiple Lines (e.g., Three-Line), Multi-Dot, Spread (TR50L Stencil) |
As needed |
TR50L: Stencil ideal for large, even coverage. TG-8: A4 paper thickness guide crucial for consistent large area spread. |
C. Mounting the Cooler
Proper cooler installation is the final, critical step in ensuring the thermal paste spreads evenly and creates an optimal thermal interface. The cooler's mounting mechanism is an active participant in this process, especially for non-manual spread methods.
- Once the thermal paste is applied according to the chosen method, carefully align the CPU cooler's base plate or water block directly over the CPU's IHS.
- Gently lower the cooler straight down onto the CPU.
- Crucially, avoid twisting, tilting, or sliding the cooler once it has made contact with the thermal paste. Such movements can smear the paste unevenly, create air bubbles, or disrupt the intended spread pattern, all of which compromise thermal performance.
- Secure the cooler's mounting screws or clips. It is widely recommended to tighten screws gradually and in a diagonal or cross-pattern (often referred to as an "X-pattern"). For example, tighten one screw a few turns, then the one diagonally opposite it, then the third, and finally the fourth, repeating the cycle until all are firmly but not excessively tightened. This method ensures that pressure is applied evenly across the IHS, which is vital for uniform paste spread and optimal contact.
- Do not overtighten the screws, as this can potentially damage the CPU, the motherboard socket, or even warp the cooler's base plate, leading to poor contact. Follow any torque specifications provided by the cooler manufacturer if available.
D. (Optional but Recommended) The Verification Step
For users seeking complete peace of mind, especially those new to PC building or trying a new application method, a quick verification step can be insightful.
- After lightly mounting the cooler (before fully tightening if your mounting system allows), you can carefully remove it to inspect the spread of the thermal paste on both the CPU IHS and the cooler base.
- Observe the pattern. Ideally, you should see a thin, relatively even layer of paste covering most, if not all, of the IHS. Large bare spots or a very uneven, thick-and-thin pattern might indicate an issue with the initial amount of paste, its placement, or the evenness of the mounting pressure.
- Extremely Important Reminder: If you do remove the cooler for inspection, the thermal paste seal is broken. The previously applied paste must be thoroughly cleaned off both the CPU IHS and the cooler base using isopropyl alcohol and a lint-free cloth. You must then reapply fresh thermal paste from scratch, following the preparation and application steps again. Do not reuse the disturbed paste. Once the paste has been compressed and then separated, air pockets are inevitably introduced, and the uniformity of the layer is compromised. Re-seating the cooler on disturbed paste will trap these air pockets and result in a significantly less effective thermal bridge than a fresh, undisturbed application.
While optional, this verification can be a valuable learning experience, helping users understand how their chosen application technique and mounting pressure translate to the actual paste spread, reinforcing the principles of achieving a thin, uniform thermal interface.
5. Elevate Your Cooling with Fehonda Thermal Solutions
Understanding the principles of thermal paste application naturally leads to seeking products that simplify the process and maximize effectiveness. Fehonda's range of thermal solutions is designed with these user needs in mind, addressing common challenges and uncertainties to deliver reliable performance.
Introducing Fehonda TR50L Thermal Paste Fehonda TR50L is a premium thermal compound engineered for optimal thermal performance. Key features include its high thermal conductivity of 14.8 W/mK, an ultra-low thermal impedance which contributes to lower CPU temperatures compared to common pastes, and a formulation based on premium Zinc Oxide. Its low viscosity allows it to effectively fill microscopic abrasions and channels on the IHS and cooler surfaces, ensuring peak thermal transfer. Furthermore, TR50L is non-electrically conductive, ensuring safety for your components, and boasts a high-stability liquid compound designed for long service life, resisting drying, cracking, or changes in consistency over years of use.
A standout feature of Fehonda TR50L is its emphasis on "Installation Made Easy." Each package includes an application stencil and a spreader. This thoughtful inclusion directly addresses one of the main challenges users face: achieving an even and optimal layer of paste. The stencil, which may feature a pattern like a honeycomb , helps distribute the paste in a predetermined optimal pattern before the spreader is used to create a uniform thin film. This system takes the guesswork out of manual spreading, which can be particularly tricky for beginners or when dealing with larger, rectangular CPUs where achieving even coverage freehand is more difficult.
Introducing Fehonda TG-8 Thermal Paste Fehonda TG-8 is another high-quality thermal paste offering a good balance of performance and ease of use. It features a thermal conductivity of 8.5 W/mK and is a silicone-based compound that is non-corrosive and boasts good liquidity for straightforward application. Like TR50L, TG-8 is non-electrically conductive, ensuring safe application. It is designed for long operation time and is even suitable for automated glue filling equipment, attesting to its consistent properties.
The unique application guideline for Fehonda TG-8 is its "A4 paper thickness" recommendation. This provides users with a tangible, easy-to-understand target when applying the paste with a scraper or a similar spreading tool. By aiming for a layer as thin as a standard sheet of A4 paper, users can confidently achieve a consistent and appropriately thin thermal interface, avoiding the common pitfall of applying too much paste.
The extensive discussions in online forums and guides regarding "how much paste" and "which pattern is best" highlight a clear user need for simplification and reliability in application. Fehonda's product designs, with the TR50L's stencil system and the TG-8's A4 paper thickness guide, directly cater to these needs. By offering products with such user-centric application aids, Fehonda provides more than just thermal paste; it offers a more foolproof solution to a common PC building challenge. This approach enhances brand value beyond mere thermal conductivity ratings, positioning Fehonda as a company that understands and addresses the practical needs of PC builders.
Fehonda thermal solutions, including TR50L and TG-8, are available for purchase through the FEHONDA ThermalTechPro Store on AliExpress and other authorized resellers, ensuring accessibility for users worldwide.
6. Avoiding Common Pitfalls: Pro Tips for Flawless Application
Even with the best thermal paste, incorrect application can lead to suboptimal cooling. Many common "mistakes" stem from a misunderstanding of the material's purpose or the fundamental physics of heat transfer. For instance, the notion that "more paste is better" overlooks the fact that the paste itself is less thermally conductive than direct metal-to-metal contact; its role is to fill microscopic gaps, not to create a thick insulating layer. Similarly, the concern about air bubbles during manual spreading is valid because air is an exceptionally poor thermal conductor. Reusing paste after breaking the cooler's seal is detrimental because the carefully achieved thin film and air displacement are ruined. By understanding these principles, users can avoid common errors and achieve the performance their components and Fehonda thermal solutions are capable of.
Here’s a recap of critical mistakes to avoid and some pro tips:
-
Don't Forget to Clean: Always thoroughly clean old thermal paste, dust, and any oily residue from both the CPU IHS and the cooler's contact surface using isopropyl alcohol and a lint-free cloth before applying new paste. A clean surface is paramount for optimal thermal transfer.
-
Avoid Using Too Much or Too Little Paste: As extensively discussed, the goal is a thin, even layer. Too little leaves air gaps; too much creates an insulating layer and risks spillage. Fehonda’s TR50L stencil and TG-8 A4 paper guide help mitigate this.
-
Ensure Even Cooler Mounting Pressure: Uneven pressure from the CPU cooler can lead to an uneven spread of thermal paste, regardless of the initial application method. Always tighten mounting screws gradually and in a diagonal or cross pattern.
-
Never Reuse Paste After Removing the Cooler: If the heatsink is lifted after the paste has been spread and compressed, the thermal interface is compromised. Always clean both surfaces thoroughly and apply a fresh coat of thermal paste.
-
Be Cautious with Manual Spreading: If you choose to spread the paste manually (without an aid like Fehonda's TR50L stencil), do so carefully to avoid introducing air bubbles, which act as insulators.
-
Fehonda Pro Tips for Optimal Results:
- Firm Seating: Double-check that the CPU cooler is seated firmly and makes consistent, even contact with the CPU IHS after installation.
- Fan Connections: After reinstalling the cooler, ensure all fan and pump (if applicable) cables are correctly reconnected to the motherboard headers.
- Pre-Applied Paste on New Coolers: If you are installing a brand-new CPU cooler, check if it comes with thermal paste pre-applied by the manufacturer. If it does, you can use it, or you can choose to carefully clean it off and use a Fehonda thermal paste for potentially enhanced performance or specific application benefits. If you save the Fehonda paste, ensure it's stored correctly for future use.
- Settling Time/Curing: While many modern, high-quality thermal pastes like those from Fehonda are designed for optimal performance shortly after application and do not require extensive "curing" or "break-in" periods , allowing the system to go through a few thermal cycles (heating up during use and cooling down) can sometimes help the paste fully settle into all microscopic voids, potentially offering a marginal improvement in thermal transfer over the very first power-on. Some older or specialized pastes might have longer "break-in" periods mentioned , but this is not typical for user-friendly pastes like Fehonda TR50L or TG-8.
7. Keeping it Fresh: When Should You Reapply Thermal Paste?
Thermal paste is not a "set it and forget it" component that lasts indefinitely. Over time, its effectiveness can diminish due to the repeated thermal cycles (the expansion and contraction from heating up during CPU use and cooling down when idle) and various environmental factors such as ambient temperature and dust accumulation. More intense CPU usage, typical for gamers or professionals running demanding applications, leads to more frequent and extreme thermal cycles, which can accelerate the degradation process, sometimes referred to as "pump-out" (where the paste is slowly squeezed out from between the IHS and cooler) or "dry-out" (where volatile components in the paste evaporate, reducing its efficacy).
Signs It's Time for Reapplication: Several indicators can suggest that your thermal paste may need replacing:
- Rising CPU Temperatures: If you observe that your CPU temperatures are gradually climbing higher than usual under similar workloads or at idle, it's a strong sign that the thermal interface is becoming less efficient.
- Increased Fan Noise: As CPU temperatures rise due to degrading thermal paste, the system's cooling fans will often spin faster and longer to try and compensate, leading to noticeably louder operation.
- Performance Issues: Frequent thermal throttling (where the CPU reduces its clock speed to prevent overheating), system instability, or unexpected shutdowns during demanding tasks can also point to a failing thermal interface.
General Lifespan & Recommendations: The optimal frequency for reapplying thermal paste can vary, but general guidelines exist:
- Typical Interval: For most users, reapplying thermal paste every 2 to 5 years is a reasonable timeframe. The exact interval depends on the quality of the paste used, the intensity of PC usage, and the operating environment (e.g., a hot, dusty room may necessitate more frequent changes).
- High-Performance Systems: PCs used for intensive gaming, overclocking, or heavy content creation might benefit from a more frequent reapplication schedule, perhaps every 1 to 2 years, to maintain peak thermal performance.
- Fehonda Product Longevity: Fehonda thermal pastes are formulated for durability. For example, Fehonda TR50L is noted for its "long service life" and high stability, designed to last for years without drying out or cracking. Similarly, Fehonda TG-8 offers "long operation time," indicating good endurance. These characteristics suggest that users can expect reliable performance over extended periods, aligning with or potentially exceeding general reapplication guidelines.
- The Golden Rule: Regardless of how long it has been, you must always clean off the old thermal paste and apply a fresh layer if you remove the CPU cooler for any reason. This includes upgrading the CPU, changing the cooler, performing deep cleaning, or any other activity that breaks the seal between the IHS and the cooler base.
Users should consider their specific usage patterns and monitor their system's thermal performance when deciding on a reapplication schedule, rather than relying solely on a generic timeframe. The noted durability of Fehonda pastes provides an added layer of confidence for long-term thermal stability.
8. Conclusion: Maximize Performance with Fehonda's Thermal Expertise
The effective application of thermal paste is a cornerstone of optimal CPU cooling, directly impacting your system's performance, stability, and longevity. This guide has underscored the critical importance of using the correct amount of thermal paste—enough to fill microscopic imperfections but not so much as to create an insulating layer or cause spillage. Thorough cleaning of the CPU IHS and cooler surfaces, choosing an application method appropriate for your specific CPU type and paste viscosity, and careful, even mounting of the CPU cooler are all integral steps in achieving a successful thermal interface.
With the right knowledge and high-quality materials, achieving peak cooling performance is an attainable goal for every PC builder and enthusiast. Fehonda is committed to empowering users with both. Products like Fehonda TR50L, with its innovative application stencil and spreader, and Fehonda TG-8, with its practical A4 paper thickness guideline, are designed to take the guesswork out of this crucial process. These solutions help ensure a consistent, effective application, minimizing common errors and maximizing heat transfer.
By providing comprehensive, nuanced, and user-friendly guidance alongside intelligently designed products, Fehonda aims to build significant brand trust and authority. This article serves not just as a "how-to" but as a demonstration of Fehonda's expertise and commitment to helping users achieve the best possible performance from their hardware.
For a cooler, more stable, and higher-performing PC, explore Fehonda's range of advanced thermal management solutions. Trust Fehonda to help you unlock your CPU's full potential.